


Early on in private pilot training, the slip to landing seemed to be a daunting task. Setting up a slip and then, in a controlled and coordinated way, taking the cross control out and transitioning to a normal landing just over the runway seemed like a difficult challenge. However, as I’ve gotten better at handling crosswind landings and the gusts that occur, the skills to handle the forward slip have developed as well. Today was a day I spent working out that skill set.
We went through the pattern as normal, except that I kept power and altitude up going into the final leg in order to intentionally come in too high. The runway was 160 and winds were between 4 and 7 knots coming mainly from the East. The slip is fairly straight forward: wing into the wind and full rudder. One change is that we did this with no flaps. While the Cessna 172 SP can handle slips up to 20° of flaps (the POH mentions that in certain conditions a buffet can occur with full flaps), we did this with no flaps in order to get down faster. I suppose one of the differences here is that during the side slip to account for crosswind, the amount of rudder necessary is to keep the centerline and the aileron is to counteract the wind; in the forward slip it is full rudder to present the side of the aircraft to the oncoming air and the ailerons are used to control the direction of the descent. Once the “good glideslope” sight picture is established, the cross-control is removed.
During this forward slip the speed is kept pretty high. My instructor told me to keep it between 70 and 80 knots. One error I made early one when transitioning back to normal landing is to pick up the nose to slow down. Of course, this causes a balloon which negates the slip that had occurred up to this point. The correction here is to keep the nose down and use the flaps to help slow the plane. With each notch of flaps the nose will want to come up, so it’s a series of progressive nose-down pressures with each.
Getting out of the slip takes a bit of practice, but much like practicing stalls, with each run through, confidence builds and it can be done more rapidly. At first it was difficult to get from 80 knots to 65 knots on short final, but with a more rapid flap deployment, the landings became better and better.

Looking back on the ADS-B data for the flight, quite a lot of altitude can be shed in a short span of time. While this wasn’t a particularly aggressive attempt to lose altitude, we still managed a descent rate in excess of 1200 ft/min.
I was a little distracted today at work, looking out my window and seeing great flying weather outside. I flipped open the ADS-B Exchange map, took a look at my local airport, and at that moment was treated to this sight.

Earlier:
Archer 344D takes off Runway 16 and makes left traffic.
Cessna 4659G takes off and makes right traffic having not been given a direction by tower.
This is the transcription of the relevant comms.
Tower: “Cessna 4 6 5 9 golf, runway 1 6 cleared to land.”
Cessna 4659G: “1 6 cleared to land, 5 9 golf.”
90 second later
Tower: “Archer 3 4 delta, do you see the Cessna off your right?”
Archer 344D: “Off our right? No, 3 4 4 delta”
Tower: “Archer 3 4 4 delta, alright, I’ll call your base then.”
Archer 344D: “3 4 4 delta is already on base.”
Tower: “I’m sorry, do you have the traffic… Cessna 5 9 golf, traffic alert, traffic just uh, you turned in front of the Archer there at one thousand one hundred, climb now and then reenter the downwind.”
Cessna 4659G: “alright we’re climbing and then reenter the downwind.”
Archer 344D: “3 4 4 has the traffic in sight, no factor.”
Helicopter 5AZ: “Helicopter 5 alpha zulu is a mile to the West.”
Tower: “Roger, you go straight to Hawthorn ramp and just uh keep it going across that runway, traffic short final.”
Helicopter 5AZ: “Traffic in sight, straight to the ramp, 5 alpha zulu.”
They cross off the far end of runway 16.
Tower: “Archer 3 4 4 delta, runway 1 6, cleared touch and go, traffic crossing downfield helicopter.”
Archer 344D: “Traffic in sight, cleared touch and go runway 1 6, 3 4 delta.”
Tower: “Cessna 5 9 golf, and I don’t know what happened there, sorry about that, you can reenter the final, come back to the runway, runway 1 6 cleared to land.”
Cessna 4659G: “No problem, uh we’re uh, uh ruh… turn back to the runway, 5 9 golf.”
Having once been given an instruction to taxi across a runway by ground while tower had given landing clearance, I’ve developed a healthy skepticism of tower instructions – “trust and verify,” as they say. This event illustrates how important it is to never be complacent at a towered airport; always maintain situational awareness!
Manual flight planning is tedious work. Every time I do it the process takes hours. Originally, I thought it was just me, but upon asking my instructor, he said that it even takes him 2+ hours to do it by hand. That’s for a trip there and back. The 150+ miles, 3 airport (landing to a full stop) student solo cross country adds an extra leg to this. So naturally it took me around 5 hours to figure it all out the day before. Seriously, I cannot wait to be done with flight training so that I can use technology to help this. As a fantasy, I do wish that there were better automated tools than what we have today (see my posts about flight planning with Skyvector.com).
The plan was 06C (Schaumburg) to KJVL (Janesville) to C73 (Dixon) and back to 06C. The first leg included a straight out climb and then a climbing turn to the Northwest when clear of the 2nd Bravo shelf. The second leg was a straight shot, and the last leg was a little North of straight in order to dog-leg around the Delta airspace at KPDA. Going to a towered airport was a bit of a challenge to myself, but I was somewhat familiar with the route given the cross country I did before Covid-19. However, I also knew going in that the controllers there have a reputation. The intent was to make the initial call with “student solo” and hope for some leniency. I was on the fence between SQI and C73, but decided that I didn’t to stretch the flight out longer than necessary. The last leg was don’t strategically to give myself airports along the route as potential outs, and because I was already somewhat familiar with DKB from previous flights. DKB was also an easy landmark to begin the descent from 5500 ft to 3500 ft to get under the Bravo again.

Climbing out from 06C is tedious to plan because of O’Hare’s inverted wedding cake. Take off at 801 feet, climb to 1600, climb to 2500, climb to 3500, and finally climb to 4500. Since the two climbs are so close together, my shorthand is to plan the total of the two climbs for time, and record the ETA for the first geographic checkpoint. As a shortcut for fuel, it is to plan the total for all of the climbs. This is a fairly unique problem to 06C; there aren’t any other airports under the second ring of O’Hare’s airspace.
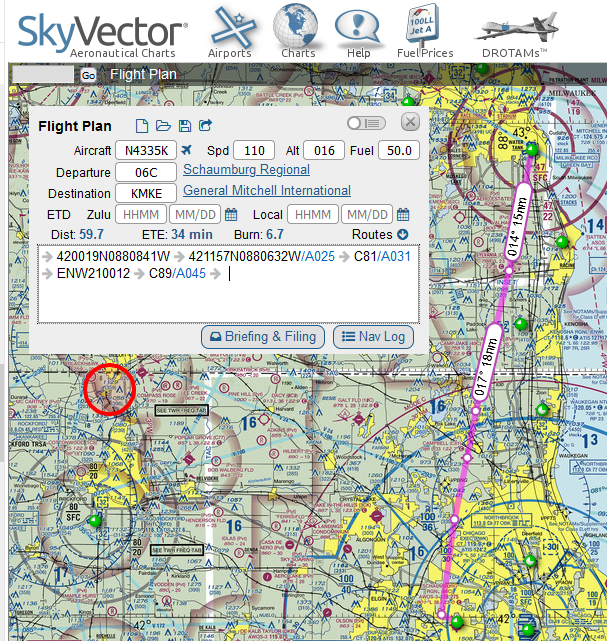
In retrospect there are things I wish I’d done differently. First, it’s bad enough flipping from top to bottom on a chart. FAA, if you’re listening, a humble request: can we get mini charts? Seriously, charts are huge, and flipping top to bottom like this is a pain when you’re actually using the charts and not a tablet. Flipping over the top of the chart while the plan is on three folds, is even worse. Maybe there’s a technique to this I just have yet to master. The second thing I should have been a bit more cognizant of was this symbol to the Southwest of Rockford was showing.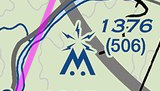 This is the Byron Generating Station, a nuclear plant’s cooling towers. Steam plumes were rising from there to thousands of feet above me. I know, don’t fly over smoke stacks, and I was going around it anyway; however, it would have been nice to know that this was a potential issue. It would be great if the FAA updated the charts to include potential high altitude stack emissions. Third, although moot since I was flying at 4500 ft, I should have been more cognizant of landmarks that would ensure I was clear of the RFD Delta. While I planned to be both clear laterally and vertically and flew clear, I did not give myself enough checkpoints to be absolutely sure. In retrospect, “be sure to be West of the Rt. 20 interchange, and be sure to be West of Byron, IL” or “be at 3201 ft by the time you reach rt. 20.” Finally, I should have planned to be North of Rochelle. I fixated on the I-88/I-39 interchange as my landmark, and had flight following in my plan; however, it would have been much smarter to intentionally head North of there from the start. I could have instead flown Northeast to intercept the V 172 airway, the light blue line on the map that would have taken me pretty much directly to my home airport.
So that was the plan. West at 4500 feet, East at 5500 feet. As I’m fond of quoting from the movie “The Way of the Gun,” “A plan is just a list of things that don’t happen.”
First mess-up: checklist items. I got so task saturated on the progressive climb-out from 06C, course changes, keeping track of times, etc… that I forgot the climb and cruise checklist until around 12 nm into the trip. Another thing that threw me off was that under the second shelf at 3500 ft I’m looking at the tailpipe of an Airbus A220 airliner maybe 500 feet above me. It also took this long to get over the hesitancy to call Chicago Approach for flight following. “Chicago Approach, November one two three four kilo, VFR request.” “VFR request unable.” I’m sitting there stammering to myself for a moment, like Milton from “Office Space,” but quickly decide I’ll keep listening to see if anyone is being routed around me and pick up Flight Following from Rockford as I get further out. I haven’t picked up flight following at all this go-around in my training, so I don’t have any comfort at all with what to say to them yet. Nevertheless, I take my queues from other people contact Rockford Approach and pick up flight following with around 25 or so miles to go until KJVL. Even beyond 20 miles out the channel was so busy I could not make out the ATIS at JVL. When I did make out the JVL ATIS, it took me a minute to realize what they said was all runways were in use.
Second mess-up: I wrote down on my flight plan that JVL’s tower frequency was 118.1. That was a dumb transcription error, it’s 118.8. Incidentally, 118.1 is Rockford’s tower to the South. A quick glance to the chart and I realize my mistake and change over. I’m well within the point of contact for JVL, but nevertheless here we go. And right away, my third mess up. I forgot to include “student solo,” so right away I am getting the unfiltered Janesville experience. This leads to the second interesting event of the flight. I’m flying in at 1800 ft all the way through the Delta because I gave myself extra leeway to descend. While I’m coming in I hear tower call out to another aircraft, “where are you going?” and hear in reply that they are headed to the Southeast (and I’m heading Northwest…okay look for traffic). Tower tells him that there’s traffic directly ahead (me), and I hear the “looking for traffic call.” After a second call I spot him flying direct towards me but significantly overhead. “[his callsign] do you see the traffic.” Negative. “That call was for the other plan.” I’m pretty sure that call wasn’t using my callsign, but I reply, “November one two three four kilo has traffic in sight, he passed overhead, no factor.” “Cleared to land runway three two.” Not my best landing; I still seem to have a problem flaring high. Tower gave him a lecture, “next time don’t plan a departure route along the approach path of a runway.
Tower has me taxi to runway 14 for the next leg. In retrospect, I might have requested taxi to runway 22, but really, no matter. On the climb out I turn West of my course to regain my flight plan. It’s here when I realize that the steam coming out of the cooling towers at the nuclear plant might have been an issue. I also fleetingly wonder, “am I doing something wrong here?” Otherwise the flight down to Dixon was uneventful and scenic. I picked up my highway landmark but missed my VOR. As expected from the NOTAMs, Dixon AWOS is down, and I glance at my radio station list and pick up the weather at KSQI. Wind is 330 at 3.” Damn, decision time – I can either go for the long runway 26 or the short runway 30. I decide on the long runway. With the airport in sight I’m handed off from flight following once again, and I dial in Dixon Municipal C73. I’m hearing massive radio calls, and at first I cannot make out the airport they’re saying, but soon I realize they’re saying “Lake in the Hills.” Apparently it’s a very busy day at 3CK. Finally after a break I make my meek call, “Dixon traffic, N4335K is 7 to the Northeast, inbound for runway two six, Dixon.” In my head I wonder if everyone at 3CK is wondering, “where the heck is Dixon?” There’s nobody at Dixon. But I realize I’m on the wrong side of the airport for a left traffic pattern. Still unsure of the traffic at Dixon I try to plan my approach. I can either overfly the field and do a teardrop entry, or I can loop around the airport to come in on the 45 degree entry. I should have done the former but instead I loop around the airport a bit above pattern altitude to approach from the South. After coming in on the downwind entry I realize I’m low. My base leg is long, and on final, I’m drifting North of the runway. “Going around.” Full power, drop 1 notch of flaps, and climb. This makes no sense to me – I’m drifting upwind! Okay, let’s try again, but go for runway 30. However, my crosswind for 30 is way too long and I basically have to come in on the 45 for 30. However this runway is looking very short and I’m not getting a stable pattern. Getting frustrated and flustered, I cannot solve this wind problem. I decide to leave the pattern, climb to 2500 feet, and rethink the problem. I circle around Dixon and come in on the 45 degree entry for runway 26 again. It’s midway along the downwind I finally spot the wind sock. The small end is pointing to runway 8 and it’s not hanging down. Okay, fine, I see why I couldn’t get a stable approach, no problem, turn crosswind for runway 8. I line up on runway 8 and I have way too much energy, so I float a long way down. However, I managed to bleed the energy off and greased my landing.
There’s something about getting used to patterns at 06C – the pattern altitude is 800 feet AGL, not 1000 feet. I’ve become used to a low pattern. Evidently I really need to spend time at airports with normal traffic pattern altitudes. The big downside of landing long at C73 – there isn’t a direct path back to 8 from the far end of the runway. During the long taxi back I hear someone else coming in to Dixon for runway 8. His landing was much, much better than mine.
On to the final leg, and I’m running late – my rental block is ending shortly and I have around a 30 minute leg back. The climb out to 5500 feet was quite easy and the air at that altitude was amazingly smooth. As I’m at altitude approaching KRPJ I hear Rockford approach give notice to another airplane that I’m heading their way. After the exchange I decide right away to pick up flight following. I receive my code and he routes me North. I don’t see the other traffic yet, but it is also somewhat strange to me – I’m at the odd thousand plus 500 heading East. I shouldn’t be encountering someone headed West. Nevertheless, I’m headed to the North side of Rochelle and proceed back on course. After a while I’m handed off to Chicago Approach South. And here is where I realize, I have no idea what to say to them after a handoff – this is something I hadn’t done in over a year. What you’re supposed to say is, “Chicago Approach, Archer one two three four kilo, VFR at five thousand five hundred.” What I said was, “Chicago Approach, N1234K is with you.” Well, now I know. Over De Kalb I’m reminded, “remain outside of the class bravo at all times.” I’ve fallen behind again, DeKalb is my top of descent point. “Will remain outside of bravo, N1234K,” and start my descent in earnest. I make it to 3500 feet before entering so I’m under, and continue down to 2500 well before the next shelf. Here I’m given a traffic alert at 8 miles, and at 3 miles out spot the Cessna headed the other direction. A small course change to the North and I will pass behind him. At this point I can see the buildings that are in the town of my home airport, and start looking for the landmarks that will let me know I’m clear of the Delta airspace South of the airport. Somewhere between my ten and five mile radio call I hear someone on the CTAF announcing a landing on the opposite direction runway. “We’re landing on two niner today.” Once again, I’m not making the biggest mistakes in the sky.
All told, it was a nerve-wracking experience. The five hours of planning the day before was intense. I didn’t get the best night of sleep before because of the nervousness. All morning I was literally shaking I was so nervous about all of this. However, it is done! The pressure to just get it done is over. The rest of my flying career I can work on making it perfect. Now begins the phase of getting check-ride-ready. Honestly though, I think I need some time to just catch up with my knowledge areas – I’m not feeling apace in all areas.
Place the cursor in the white box to begin typing.

Enter ICAO code
Examples: 06C, KMKE
Enter the ICAO code
Examples: OBK, DPA, TII
AAABBBCCC
AAA is the 3-digit ICAO Code
BBB is the 3 digit radial
CCC is the 3 digit distance in nautical miles.
Enter the ICAO code immediately followed by the 3-digit radial and immediately followed by the 3-digit distance in nautical miles. Fractions of a mile and fractions of a radial are not permitted.
Examples: OBK090010, Northbrook VOR, 090 radial, 10 nm. DPA360005, Dupage VOR, 360 radial, 5nm. Alternatively DPA000005, Dupage 000 radial, 5 nm.
Enter the 5-digit code
Examples: VPFTS, Fort Sheridan. CHIKO RNAV waypoint. PAPPI intersection
AA(BB)(CC)DEEE(FF)(GG)H
AA is the 2-digit latitude in degrees
BB (optional) is the 2-digit minutes
CC (optional) is the 2-digit seconds
D is N or S for North or South
EEE is the 3-digit degrees of longitude
FF (optional) is the 2-digit minutes of longitude
GG (optional) is the 2-digit seconds of longitude
H is W or E for West or East.
Enter the GPS coordinate all as one large block. Convert decimal minutes into seconds before entering.
Victor routes should only be entered in between two waypoints, or between a departure and destination. Enter the Victor Route. SkyVector will fill in the start and end points of that route.
Example: 06C to KJVL, enter V24. SkyVector fills in OBK V24 JVL. KPWK to UMUZI to KJVL. Enter V24 after UMUZI. SkyVector fills in UMUZI V24 JVL.
Modifiers are added to waypoints to change either the altitude or speed at that waypoint. To add a modifier, add a forward slash / after the waypoint. Then add the type of modifier. To modify both speed and altitude include both with no spaces between, e.g. /A045N0110. Important: the cruise altitude and speed entered at the top of the flight plan should be reached at or before for the first waypoint. When altitudes are modified, SkyVector will compute TOC and TOD based on aircraft performance in the NavLog. Altitude modifiers are the altitude that will be reached, if possible, after the waypoint is reached.
A###. The numbers are feet in hundreds.
Example: /A045 to change the altitude of the waypoint to 4500 feet MSL.
F###. The numbers are the flight level.
Example: /F160 changes the flight level to FL160. /F060 changes the flight level to FL060 (6000 feet).
N####. The numbers are knots.
Example: /N0120 changes the airspeed to 120 knots.
M###. The numbers are hundreds of the Mach number
Example /M095 changes the airspeed to Mach 0.95
Departure procedures should only be filled in after the Departure Airport is filled in. Enter the 5-character name immediately followed by the number of the procedure. Skyvector.com will fill in the fixes based on the departure. The NavLog will have all waypoints of the departure procedure.
Examples: JORJO5, JORJO FIVE from KPWK. Skyvector will fill in JORJO. UECKR6, UECKR SIX departure from KMKE. Skyvector will fill in UECKR.
Arrival procedures should only be filled in after the Destination Airport is filled in. First enter a waypoint listed on the procedure, then enter the 3 to 5-digit code for the procedure immediately followed by the number of the procedure. The NavLog will have all of the waypoints of the arrival procedure. Note, for arrivals with more than one route converging, only waypoints after the merge can precede the arrival; waypoints along the branches cannot be used with arrival procedures.
Examples: BDF BDF7, BRADFORD SEVEN arrival at KORD starting at waypoint BDF. GOPAC GOPAC2, GOPAC TWO arrival at KMKE starting at GOPAC.
06C 420019N0880841W 421157N0880632W/A025 C81/A031 ENW210012 C89/A045 KMKE. Spd 110, Alt 016.
Start at 06C. Fly to the intersection of Barrington Rd and Irving Park Rd at 42°00’19″N, 88°8’41″W reaching an altitude of 1600 feet. Fly to the Lake Zurich reporting point at 42°11’57″N, 88°06’32″W and then climb to reach an altitude of 2500 feet at or before this waypoint. Fly over Campbell Airport C81 and then climb to reach an altitude of 3100 feet. Fly to the chain of lakes at Lindenhurst that is 12 miles on radial 210 of the ENW VOR at Kenosha. Overfly Sylvania Airport C89, then climb to reach an altitude of 4500 feet at or before this point. Fly and land at KMKE. Based on the current weather at the time of writing, the following plot and Nav Log are created.

Contrast this with the following example where the climbs were all moved up one leg.
06C 420019N0880841W/A025 421157N0880632W/A031 C81 ENW210012/A045 C89 KMKE
Start at 06C. Fly to the intersection of Barrington Rd and Irving Park Rd at 42°00’19″N, 88°8’41″W after reaching an altitude of 1600 feet. Begin a climb to 2500 ft while turning to fly to the Lake Zurich reporting point at 42°11’57″N, 88°06’32″W. Begin a climb to 3100 feet while flying towards Campbell Airport. Fly to the chain of lakes at Lindenhurst that is 12 miles on radial 210 of the ENW VOR at Kenosha, then begin a climb to 4500 feet. Overfly Sylvania Airport C89, then fly to and land at KMKE. Based on the current weather at the time of writing, the following plot and Nav Log are created.

Start a new flighit plan and try entering this into the navigation:
I69 390527N0840326W 390626N0835057W 390752N0833233W 390903N0831303W KEOP/N0095 392030N0825556W XUB110002 LCK V19 I23/N0100A041 MXQ145005 I69
SkyVector.com creates the following flight plan. Notice that in between V19 the waypoints JORUV and GAILL were added automatically.

Adding speed and alt of 110 and 050, respectively, the following NavLog is created. Note that since the V19 was used, instead of the direct-to symbol in the Route we get the V19 route.

The homework assignment: 3-legs, around 180 nm, cross country with some hood work. I spent most of the day Saturday working out the plan. The first stop was the same location we did the last two cross countries, but the second stop is a totally new airport. However, there were a lot fewer features on the sectional chart between these two.
I feel like it takes me way too long to put together cross countries. It’s taking me hours to work all of this out. I don’t know if I am over-thinking the paper and pencil navigation log or I’m just not practiced at it yet. I hope it’s just the latter and that these sorts of things get easier with practice. The hardest part of all though is how long it takes to figure out the climbs and descents. I have to say, the chase around plot is fine for showing a lot of information, but holy hell is it hard to pick out precise numbers. Do the numbers even need to be so precise? Case in point, the fuel, time, and distance to climb chart.

If you’re climbing to a pressure altitude of 8000 ft then there’s a lot of gap in between the lines. The climb out of my home airport is under a class B shelf. The first climb is 800 feet, the next is 900 feet, the next is 1000 feet, and then another of 1000 feet to cruise altitude of 4500 feet. Dear Piper, can you maybe spread out that lower chart a little bit? Maybe a logarithmic horizontal axis instead? It actually grinds my hears a bit when there are only two squares between 5. And this is a pressure altitude, so the first climb is to maybe 500 feet pressure altitude and at a temperature of -2°C…that’s zero on the chart. I guess you could just use the climb performance chart on the previous page of the POH, but again, we’re taking off below the chart…do I just use around 770 fpm, and assume 1 minute, 9 gal/hr = 0.15 gallons of gas?

I printed off full-size pages of these charts to do my flight planning. These climbs under the class B drive me nuts. I actually really enjoy doing the one out of the towered airport because I don’t have to deal with these small climbs in my nav log. Straight up to a pressure altitude of 4000! Easy…ish! That’s like halfish way between 0 and 2.5 gallons, just under 5ish minutes, and halfish way between 5 and 7.5 nautical miles.
The descents are a little bit tricky also. 3:1 descent is the rule. 3 NM per 1000 feet of altitude. Extrapolating the math, 100 knots ground speed will take 1.8 minutes to cover 3 nm, and so to descent on time the rate needs to be 555 fpm. However, ground speed is a big variable. We could be doing anywhere from 70 to 130 knots over the ground depending on the winds. I like to assume a 500 fpm descent, but here’s the bitch of all of this – the top of descent you don’t know until you know the ground speed, and you don’t know the ground speed until an hour before the flight because you don’t know the winds. Sometimes the top of descent is before a waypoint, sometimes it’s after. Or do you just assume 3 NM per 1000 feet always and adjust the rate of descent? Everyone uses the 3:1 rule, so I generally do that. But my planning so far has not involved calculating the actual descent rate. I don’t know why nav logs don’t explicitly call this out.
While I was filling in all the angles and ground speeds the day of the flight the weather was just not being consistent. The second leg to the new airport was flipping between MVFR and VFR all day. Ultimately when I arrived it was overcast with clouds at 2100 feet. Clouds are reported in AGL, not MSL, and the airport is 650 feet, so it would be a very quick flight. I planned that leg for 5500 feet the night before… do I replan it for 2200 feet on the fly? All new top of climb and top of descent points. Ultimately we decided to just go to the first airport and back with the plan of doing hood work on the way back.
This takeoff was to the opposite direction this time. I’ve never taken off to the East before. Right away, the first climb is not enroute. Maybe it’s just the constant climbs up from the class B and calling up approach control for flight following, but right away I fell behind the airplane and did not even catch my first waypoint. I forgot to set and reset the timer, record times. I was focused on keeping the heading and listening to the controller and spotting my waypoints and changing the radios and changing the VOR receiver and shuffling papers and charts. I think what I’m missing is having a plan in my mind about what I will do and what comes next. I need to chair-fly this, and practice it on X-plane, and rehearse all of the tasks and internalize all of this.
On the way back I put on the yellow foggles and it was time for instrument work. I rocked hood work. The phrase “blue power through, brown power down” was new to me, but it makes sense. If the attitude indicator shows you pointing downward you’re accelerating and you need to power down to avoid over-speed. I guess all the years of sim flying made me predisposed to having a good instrument scan. It’s really just keeping your eyes moving and back to the attitude indicator. Start with the AI and at each other instrument one at a time. Did some standard rate turns. Another rule of thumb: airspeed / 100 + 5 is the angle of bank. 100 knots airspeed / 10 + 5 = 15° of bank.
We also did a little bit of lost procedures. The five (six) Cs: Climb (to get a better view and get better radio reception), (Circle to stay in place and figure out where you are), Confess (that you’re lost), Communicate (with anyone you can get on the radio), Comply (with whatever instructions you get), and Conserve (fuel by reducing power). Using VOR triangulation, I used Avare! and drew the approximate radials. Precision is not necessary – just get an idea of where you are using the two radials and find the landmark on the sectional that will help you navigate. Circle while this is going on so you don’t move too far from your original VOR radial while the second one is being dialed in.
I still have to learn Morse Code. I print off a radio sheet with my flight plan and this time I added the morse code for the VORs. One is supposed to identify them by listening to them. It helps to know the Morse Code. I will have to take some time to learn it so that I don’t need a cheat sheet…one more thing to distract me when I’m already task saturated that I need to eliminate or internalize.
I’ve had two cross country flights now. Both of them have been to KJVL and back. The first was in the day, and the second, a week and a half later, was at night. I’m not going to get into a how-to, but I did learn a few things from these two experiences.
The first flight I planned was more or less a straight line from the home airport to the destination. About four hours before the flight I calculated the wind from the forecast, the ground speed and correction angle, three ascents up to higher tiers under the Class B airspace I had to fly under, and all of this down to the degree and the second. During the flight, things went drastically different than the plan. The winds were not what was forecasted four hours before and the airplane’s performance was different than the POH. The first climb out of the airport we reached altitude much earlier. The headings were all wrong. Apparently I miscalculated a few VORs. But the thing that got me the most was how task saturated I got with all of this.
The course was across the edge of the sectional chart. These things are not small, and futzing around with a map while flying is just ridiculous. The next flight I used the TAC I have for the Southern half and the sectional for the Northern half of the trip. I needed to hand over controls to get help flipping the map during the flight. It definitely would have helped to use a pair of paper clips to keep only the relevant parts of the map open if I were to only use the sectional for the whole flight. I can totally see the utility of having this open on a tablet or phone. After I pass the check-ride I’m definitely going to rely more heavily on electronic charts like Avare! (I just cannot bring myself to spend the money on Foreflight and Apple right now).
I never actually got to logging my actual time to checkpoints. Between flying the plane, futzing with the map, trying to figure out where exactly I was, managing the radio, managing the maps, keeping my nav logs from falling out of the clipboard, etc…I just never got to logging them. Ironically we arrived right about on time, but not on course.
There’s two huge things I learned about all of this. First, dead-reckoning, the act of flying in a direction at a speed for a time and getting to a point…that’s just not going to happen on its own. It’s only half of what you need to rely on. Pilotage is just as important. I relied way too heavily on dead-reckoning. The second thing about pilotage is that you really need to get familiar with your landmarks. Not just the landmarks on course, but in big wide path around the course. Use Google Maps satellite view and find some notable things from the sky: how roads cross and meet, the shapes of lakes, interesting buildings, water towers. Look for where the forests are near the towns. The towns are not the shapes they are drawn on the maps. Know where the nearby highways are. Find the landmarks near the class B and C airspace rings. If you’re off course, know the landmarks that will tell you so. Know how big a small town is that is near an even smaller town when viewed from the sky.
Two tricks I picked up since that day cross country. First, a frequency card. Have all of the frequencies in order on a card so that you can preprogram the next one as you go. The same for the VOR radials. Write down the Morse code for the VORs when you check them so you don’t have to look at the sectional chart. Second, a wind card. Write down the wind correction angle and ground speed in directions around your flight path.
There are also two tools I want to build for myself. First, I want to build a tool that will tell me the radial and distance from a given VOR to a given GPS coordinate based on the GPS coordinate of the VOR. I only just found out yesterday though that Avare! will actually show this when in the map view. Selecting a point on the map brings up a planning window that shows both the GPS coordinate and the VOR information for that point. SkyVector does not do this (however, I did find out that you can actually set a waypoint in SkyVector using the VVVXXXYYY nomenclature, where VVV is the VOR, XXX is the radial, and YYY is the distance). This is another great reason to use electronics after the check-ride. The second tool I want to build is far easier: a wind-card calculator. The trigonometry of ground speed and wind correction angle is easy enough to just use Excel instead of an E6B computer (umpteen number of times over for every angle). The tougher part will be trying to show this graphically so that it can simply be printed as a fully finished wind card. Wind cards will be super handy during traffic patterns on windy days.
The night cross country to the same airport when much smoother. This is partly because I had time to digest the day cross country and what went wrong with it. The other part was because flying at night was in some ways easier. I could not see the airport at all in the day, but I spotted the beacon for it 20+ nm out at night. The indistinct towns amid the snowy landscape were very easy to see at night. Lastly, the night cross country was more of an experience flight than a rigorous cross country exercise. It was a gateway into seeing the challenges of flying at night to unfamiliar places. To be honest, I loved much more than flying in the day.
I’m more than half way there now. From now on it’s not about how to fly but how to navigate, how to deal with emergencies (have all the hood time to work on), perfecting maneuvers, getting in my solo time, and studying for the tests. It seems so close now!
If you have not seen it already, SkyVector.com is a great way to find aviation maps. Now that I am learning flight planning, I’ve been using it to sort of check my work when I’m developing my practice plans. Maybe I just haven’t found it yet but the instructions for creating a flight plan weren’t really too complete. After poking around the internet for a while I found some really cool tips and tricks to help make up some flight plans. I’ll skip the finer points about flight planning for the moment – this is just tips and tricks for SV.
Let’s start with a trip from Chicago Executive to Holland Michigan, KPWK to KBIV.
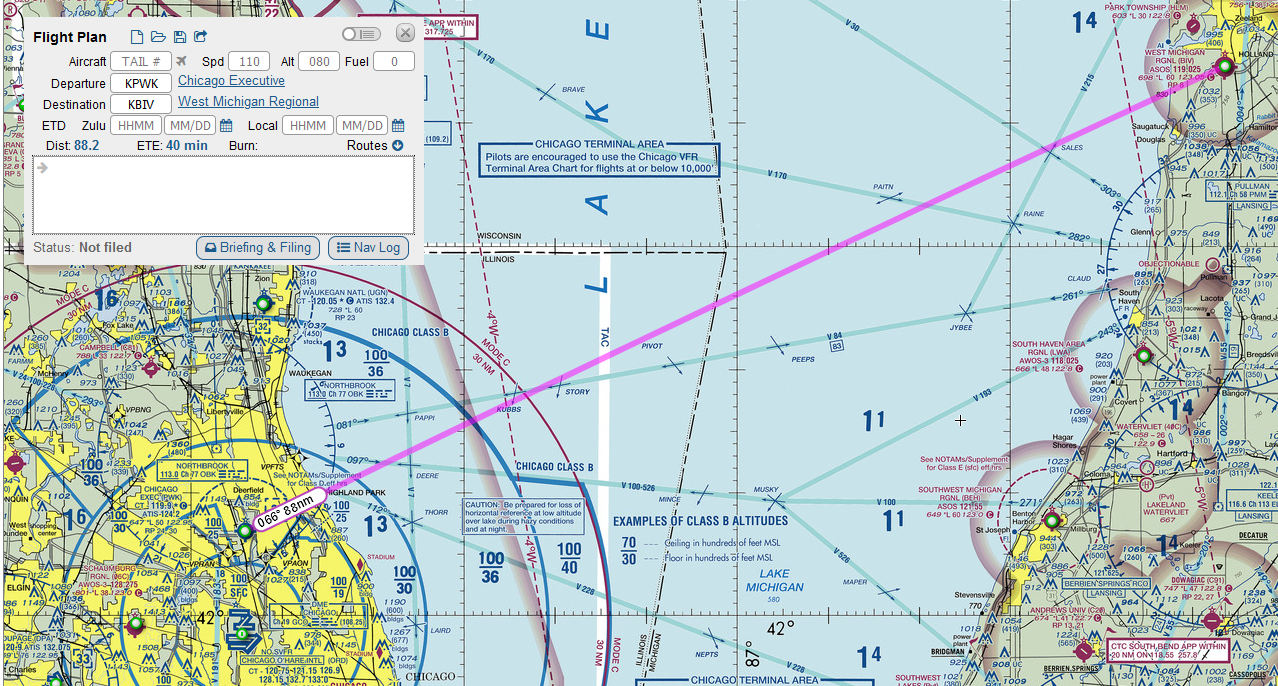
SkyVector defaults to 110 kt cruise speed and 8000 ft altitude. Fly a course of 66° from true North and you should arrive in 40 minutes. If you check the NavLog button you get a PDF of the proposed route with the current weather and places to fill in your actual time enroute, actual time over, fuel used, and actual fuel remaining.

The problem with this basic view is that we’re not starting at 8000 ft, and there is no indication of fuel use. We just know that with the current winds we have to fly a true heading of 57° with a true air speed of 110 knots. Right away, this can be fixed by adding a cruise altitude. Actually entering in 110 and 080 for speed and altitude, the Nav Log changes and adds two entries, TOC and TOD (top of climb and top of descent).

I’m not sure on what it is basing these values, but these can be changed be editing the aircraft. More on that later. For now, we’re definitely not going to fly over Lake Michigan to get there. One easy way to update the route is to right-click on the map and add waypoints. However, SkyVector adds the waypoints at the end. Right-clicking due East of KPWK brings up a bunch of options for fixes, airports, VORs, intersections, etc… and the specific GPS coordinate of where the right-click occurred. I’ll add that…


This is definitely not right. You have to cut and paste the waypoint in the box that currently shows → KBIV → 420734N0874433W, The other thing one can do is click on the Mini Nav Log button in the upper right of the box next to the X button. The flight plan changes to show icons of the waypoints below the complete text of the waypoints. If you click on the icons the map will move to that waypoint. An easy way to get out of adding waypoints after the end is to cut the last waypoints (KBIV in this case ) and progressively add to the list, then paste them back in.

Another way to add in waypoints is to click a point on the magenta line and drag it to where you want the new waypoint to be. When you release the mouse button the same selection window appears, but this time pressing PLAN will insert the waypoint between the previous and next waypoints. This is actually very useful for adding waypoints at key transition points like at the boundaries between the shelves of class B and C airspaces. You can also drag waypoints to a different location using this method. Drag the waypoint to the new location and press PLAN.
Since flying across Lake Michigan and back is no way to get to Holland, I’ll go in and make up a complete flight plan. Right-click, add the waypoint along the way, and finally cap it off with a manual entry of KBIV. I’m also going to change the first waypoint to the KENIL intersection to make it easier to load into the GPS when flying, and use other intersections along the way.

And here is the Nav Log.

Every single waypoint is at 8000 feet. We cannot fly that in the first part of the trip because of the class B and C airspace in the first part of the trip. If you change the 080 Alt in the window, it changes it for all waypoint. Similarly, the TAS for every single leg is 110. Changing the speed in the window changes the TAS for every leg in the trip. However, these can still be changed! You can add modifiers to each of the waypoints to change both speed and altitude. To change altitude, add /A###. To add speed in knots add /N###. To add speed in Mach number add /M###. Finally, to set altitude in flight level, add /F###. Here is the flight plan with all of the modifiers added.

And here is the updated Nav Log.
Finally, about climb and fuel performance. To update this that if you have to add aircraft information. When you add the tail code, filing the flight plan will also automatically update the information about the aircraft based on the registration. I’m going to make up some numbers for N4335K for example.

And finally we have a flight plan with climb performance, TOC and TOD points, and fuel usage.

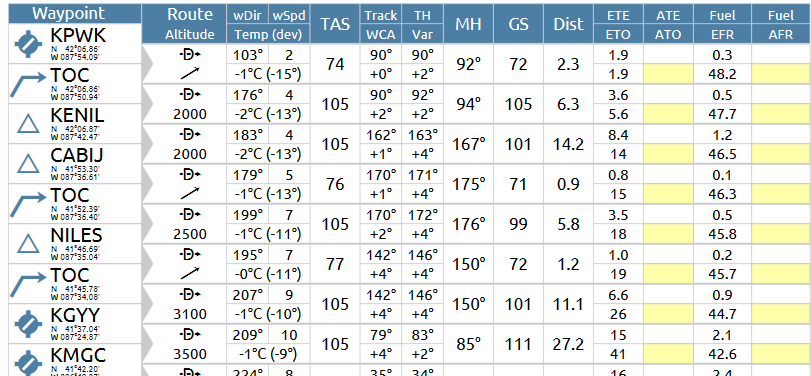
There is a problem with the way this turned out (can you spot it?). The TOC is after the first waypoint. The climb performance was set to 730 ft/min. To get from 650 to 2000 feet should only take around 2 minutes, but KENIL is 6.4 minutes out. We should have reached TOC long before KENIL. The reason this is the case is because KENIL, the first waypoint, has a modifier on it. To fix this, make sure the cruise altitude in the flight plan is the altitude of the first waypoint – do not add modifiers to the first waypoint. Resetting the cruise altitude to 2000 feet (Alt: 020) and adding modifiers only afterwards, the Nav Log now looks like this:
With a registered account, you can save this flight plan for later use. However, if you are flying sims, you can export this flight plan to your computer, and it can be transcribed into a GPS flight plan for X-Plane 11. When making manual flight plans, this is a great way to check your work. However, this is not a substitute for actually crunching the numbers. Time, fuel, and distance to climb vary with density altitude, and SkyVector has no way of knowing that.
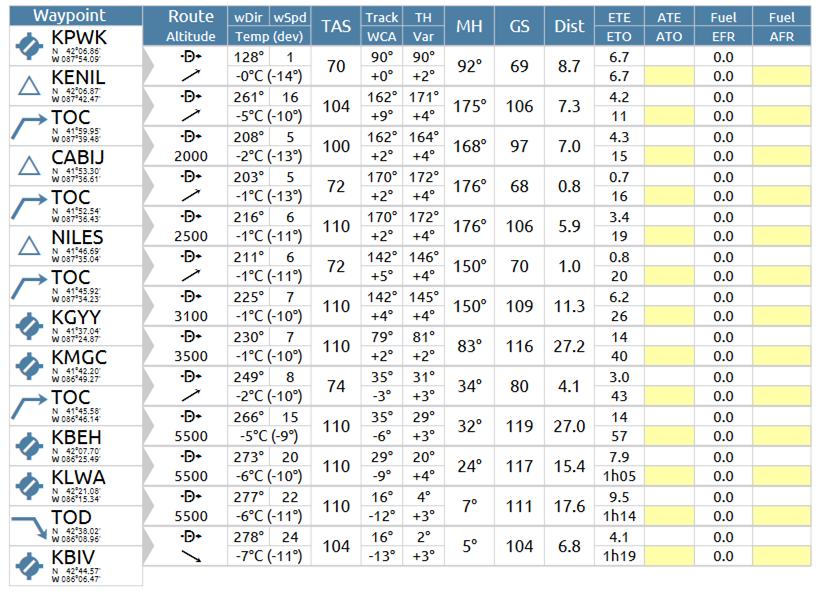
Finally, if you want to see the final version of my flight plan, just enter this into the white field in SkyVector: KPWK 420646N0874531W KENIL/A025 415329N0873546W 414156N0873014W/A031 KGYY/A035 STYLE/A055 KBEH KLWA KBIV
METAR: KXXX 081535Z AUTO 27003KT 10SM SCT042 OVC080 00/M06 A3008 RMK AO2 T00001061
Today we practiced what I was expecting to practice last week: short field takeoffs, soft field takeoffs, short field landings, and soft field landings. Now that I’ve soloed I’m about to begin learning to fly cross country. The point of this is that, during cross country, I might have to set down in an unexpected place, either an airport with a short runway, a field, or a road, so I have to learn how to handle a landing in that kind of a situation in case it happens before I venture out to other airports. In other words, always have an out – yet another tool in the toolbox you practice in case you need it but hope to never actually need it.
Short-field takeoff was first. The normal pre-flight checklist mentions to set flaps, and this has typically been flaps up. In this case flaps are 25°. This time I have to be extra sure to use all of the runway. As usual the procedure starts with a power up to 2000 RPM and check the gauges – oil temperature, oil pressure, fuel pressure in the green. However, instead of releasing the brakes and then applying full power, full power is applied and the brakes are held for three seconds to make sure the engine is fully ready. This also creates the maximum takeoff power. Release the brakes and accelerate to 55 KIAS instead of 60 KIAS, rotate, and pitch for 64 KIAS, the VX speed for the Archer, until we’re 50 feet off the runway. Once clear, it’s a pitch down to 76 KIAS, the VY for the Archer, establish a positive rate of climb (typically I saw 800 ft/min), retract the flaps slowly while adding back pressure (the nose will want to drop when the flaps are raised and the lower drag will cause the airplane to speed up, both of which will make the airplane faster than VY).
Next it was a short-field landing. This is done slower than normal, 66 KIAS instead of the 70-75 KIAS I’ve landed the last 45 times. The goal here is to use as little runway as possible so I need to be as slow as possible, transition to slow flight and hit my mark. The goal was to use the chevrons and numbers as an aim point and to use the second stripe as the touchdown point. There is a big difference in just that little bit of speed. The transition to slow flight is very quick. The Archer will stall at 49 KIAS, so there’s only 17 knots before that happens. Now I still have a habit of transitioning too high and working it down, but in this kind of a landing the transition should be rather quick and shouldn’t be too high. The stall horn will go off, and with practice it’ll go off right at touchdown. Since this is short-field, right away when the nose wheel is down apply brakes and dump the flaps. This landing was a little bit more difficult because of how fast everything was happening. I kept on thinking I was missing my touchdown target, but my instructor said I was either actually making it or when I went long it was still within the standards. I guess this is just my perfectionistic tendencies taking hold.
In the emergency situation that the short-field landing occurs, the idea is to actually come in steep and slow to land over an obstacle. For a little inspiration about short-field, here is Saba Airport.
Soft-field takeoff was very challenging. The goal here is to get the wheels to never settle into the ground, get them off the ground as fast as possible, and basically continue the takeoff roll above the ground while still in ground effect. I’ll preface this by saying I’m not particularly light, and neither is my instructor. For this one, flaps are set at 25° and I roll onto the runway but never stop so that the tires don’t sink into the ground. Also, right away, the yoke is held all the way back in order to keep the nose wheel light (you’re always flying, even when you’re on the ground, the wings are doing something). As soon as the center line is established, power is added to 2000 RPM to check the gauges, and if they are in the green, full power is applied. Fairly quickly the nose will come up. This means that there is a very high angle of attack, so the p-factor is huge. There’s very little speed so the spiral slipstream is huge. There’s a lot of torque, so the left wheel will feel a bit more loading. This means a huge amount of right rudder, and it took a few of these attempts to finally keep the airplane straight on the runway during these attempts. The stall horn will go off, and every time I heard the horn it threw me. I guess I’ve become phobic of the stall horn. I have to accept that it will go off during this procedure. Once the airplane leaves the ground (which can be very hard to detect) I’m supposed to bring the yoke forward…very far forward, almost nose-down, and hold the airplane in ground effect until we reach VX. Then it’s a matter of climbing at VX until we’re over the imaginary 50 foot obstacle, then letting the airplane accelerate to VY, and retract the flaps like with the shirt-field takeoff. One of the things that kept on happening was that the nose would come up, the airplane would leave the ground for a moment and come right back onto the main wheels, then leave the ground. I suspect what was happening was that I kept the yoke back the whole time so the airplane left the ground, pitched up, and with the stall in effect, lost lift until it had accelerated enough to have enough speed to leave the ground. I think next time I practice this I’m going to have to remember to let some of the back pressure come off so that the plane can pop off the ground and not settle back down. It’s also extremely hard to get myself to push the yoke forward to stay in ground effect – I never was fully successful.
Finally, the soft-field landings. Again, not a short field, but the idea is to be as light on the landing as possible. This means no dropping it in, so no rotating too high. Flaps stay in and back pressure stays in, just like a normal landing, except no brakes – keep the airplane moving and turn off the runway without brakes. This wasn’t too bad but my second and third to last landings I started veering just before touchdown. I think it was me again getting heavy-handed on the controls. Aileron and rudder corrections were too severe and held too long. The last landing I loosened up…and once again found the center line rather lightly. Not a bad way to end the night!
11 landings today! What a challenging day. I get used to doing things one way, and then on to something new and different! Tomorrow it is supposed to snow, so I’m going to go in for ground work to learn cross country navigation.
