If you have not seen it already, SkyVector.com is a great way to find aviation maps. Now that I am learning flight planning, I’ve been using it to sort of check my work when I’m developing my practice plans. Maybe I just haven’t found it yet but the instructions for creating a flight plan weren’t really too complete. After poking around the internet for a while I found some really cool tips and tricks to help make up some flight plans. I’ll skip the finer points about flight planning for the moment – this is just tips and tricks for SV.
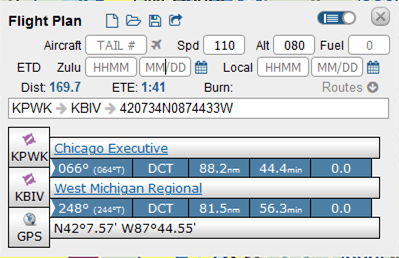
Let’s start with a trip from Chicago Executive to Holland Michigan, KPWK to KBIV.
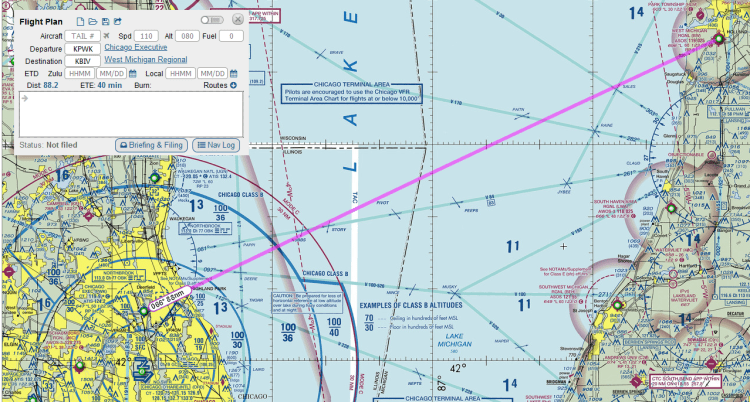
SkyVector defaults to 110 kt cruise speed and 8000 ft altitude. Fly a course of 66° from true North and you should arrive in 40 minutes. If you check the NavLog button you get a PDF of the proposed route with the current weather and places to fill in your actual time enroute, actual time over, fuel used, and actual fuel remaining.

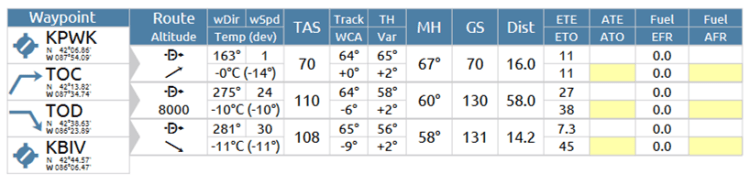
The problem with this basic view is that we’re not starting at 8000 ft, and there is no indication of fuel use. We just know that with the current winds we have to fly a true heading of 57° with a true air speed of 110 knots. Right away, this can be fixed by adding a cruise altitude. Actually entering in 110 and 080 for speed and altitude, the Nav Log changes and adds two entries, TOC and TOD (top of climb and top of descent).
I’m not sure on what it is basing these values, but these can be changed be editing the aircraft. More on that later. For now, we’re definitely not going to fly over Lake Michigan to get there. One easy way to update the route is to right-click on the map and add waypoints. However, SkyVector adds the waypoints at the end. Right-clicking due East of KPWK brings up a bunch of options for fixes, airports, VORs, intersections, etc… and the specific GPS coordinate of where the right-click occurred. I’ll add that…
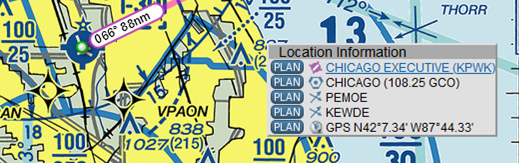
This is definitely not right. You have to cut and paste the waypoint in the box that currently shows → KBIV → 420734N0874433W, The other thing one can do is click on the Mini Nav Log button in the upper right of the box next to the X button. The flight plan changes to show icons of the waypoints below the complete text of the waypoints. If you click on the icons the map will move to that waypoint. An easy way to get out of adding waypoints after the end is to cut the last waypoints (KBIV in this case ) and progressively add to the list, then paste them back in.
Another way to add in waypoints is to click a point on the magenta line and drag it to where you want the new waypoint to be. When you release the mouse button the same selection window appears, but this time pressing PLAN will insert the waypoint between the previous and next waypoints. This is actually very useful for adding waypoints at key transition points like at the boundaries between the shelves of class B and C airspaces. You can also drag waypoints to a different location using this method. Drag the waypoint to the new location and press PLAN.
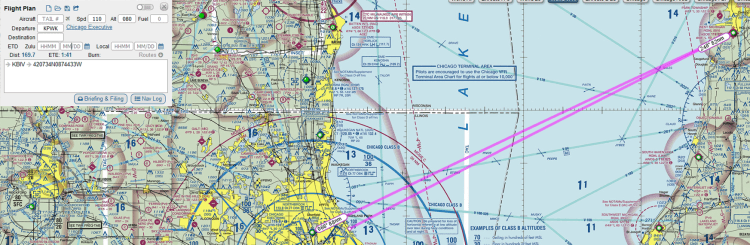
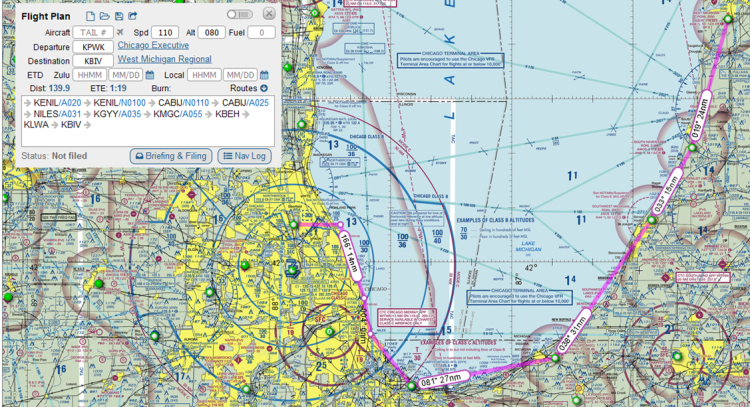
Since flying across Lake Michigan and back is no way to get to Holland, I’ll go in and make up a complete flight plan. Right-click, add the waypoint along the way, and finally cap it off with a manual entry of KBIV. I’m also going to change the first waypoint to the KENIL intersection to make it easier to load into the GPS when flying, and use other intersections along the way.

And here is the Nav Log.

Every single waypoint is at 8000 feet. We cannot fly that in the first part of the trip because of the class B and C airspace in the first part of the trip. If you change the 080 Alt in the window, it changes it for all waypoint. Similarly, the TAS for every single leg is 110. Changing the speed in the window changes the TAS for every leg in the trip. However, these can still be changed! You can add modifiers to each of the waypoints to change both speed and altitude. To change altitude, add /A###. To add speed in knots add /N###. To add speed in Mach number add /M###. Finally, to set altitude in flight level, add /F###. Here is the flight plan with all of the modifiers added.
And here is the updated Nav Log.

Finally, about climb and fuel performance. To update this that if you have to add aircraft information. When you add the tail code, filing the flight plan will also automatically update the information about the aircraft based on the registration. I’m going to make up some numbers for N4335K for example.

And finally we have a flight plan with climb performance, TOC and TOD points, and fuel usage.

There is a problem with the way this turned out (can you spot it?). The TOC is after the first waypoint. The climb performance was set to 730 ft/min. To get from 650 to 2000 feet should only take around 2 minutes, but KENIL is 6.4 minutes out. We should have reached TOC long before KENIL. The reason this is the case is because KENIL, the first waypoint, has a modifier on it. To fix this, make sure the cruise altitude in the flight plan is the altitude of the first waypoint – do not add modifiers to the first waypoint. Resetting the cruise altitude to 2000 feet (Alt: 020) and adding modifiers only afterwards, the Nav Log now looks like this:

With a registered account, you can save this flight plan for later use. However, if you are flying sims, you can export this flight plan to your computer, and it can be transcribed into a GPS flight plan for X-Plane 11. When making manual flight plans, this is a great way to check your work. However, this is not a substitute for actually crunching the numbers. Time, fuel, and distance to climb vary with density altitude, and SkyVector has no way of knowing that.
Finally, if you want to see the final version of my flight plan, just enter this into the white field in SkyVector: KPWK 420646N0874531W KENIL/A025 415329N0873546W 414156N0873014W/A031 KGYY/A035 STYLE/A055 KBEH KLWA KBIV
